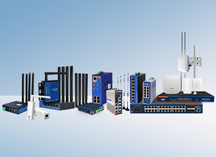
Considering that industry automation solutions should not only be reliable and available but also affordable, PUSR provides customers with a lightweight industrial automation controller based on the ESP32 — USR-M100-ARD.
The ESP32 can be programmed using many different development environments. Code can be written in C++ (like the Arduino) or in MicroPython. To make use of all of the ESP32 features Espressif provided the Espressif IoT Development Framework, or ESP-IDF.
For beginners, an easy way to get started is by using the familiar Arduino IDE. While this is not necessarily the best environment for working with the ESP32, it has the advantage of being a familiar application, so the learning curve is flattened.
Before we can use the Arduino IDE with an ESP32 board we will need to add the ESP32 boards using the Arduino IDE Board Manager.
In order to be able to work with the ESP32 you will need to add an additional source to the Arduino IDE Board Manager and then install the ESP32 boards. This is actually a lot simpler than it sounds thanks to the folks at Espressif. They have provided a link to a JSON file that takes care of almost everything for you.
If you are not familiar with JSON it is a format of text file that allows structured information to be shared between computers. In this respect, it is similar to XML.
Here is what you need to do to install the ESP32 boards into the Arduino IDE:
1. Install the current upstream Arduino IDE at the 1.8 level or later. The current version is at the https://www.arduino.cc/en/software website.
2. Open the Arduino IDE. Click on the File menu on the top menu bar.
3. Click on the Preferences menu item. This will open a Preferences dialog box.
4. You should be on the Settings tab in the Preferences dialog box by default.
5. Look for the textbox labeled“Additional Boards Manager URLs”.
6. If there is already text in this box add a coma at the end of it, then follow the next step.
7. Paste the following link into the text box-
https://raw.githubusercontent.com/espressif/arduino-esp32/gh-pages/package_esp32_index.json
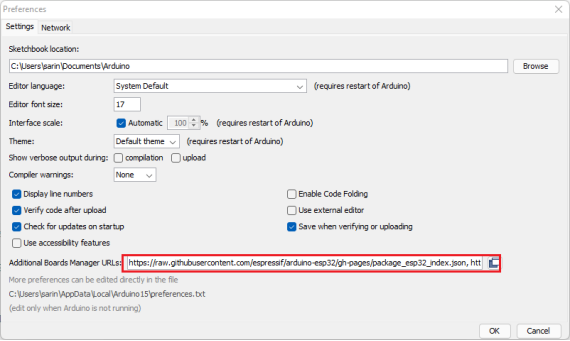
8. Click the OK button to save the setting.
Next, you will need to use the new entry to actually add the ESP32 boards to your Arduino IDE. You do that by following this procedure:
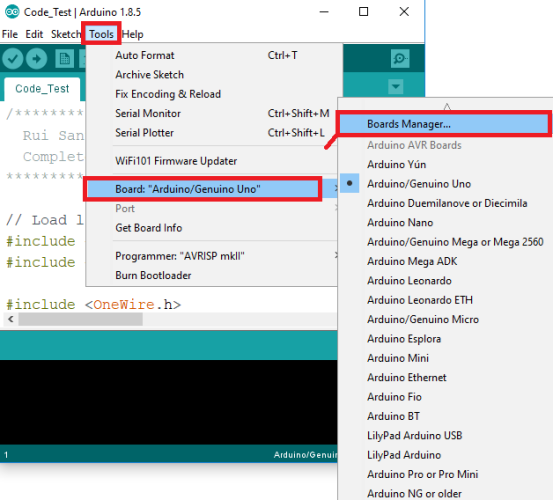
1. In the Arduino IDE click on the Tools menu on the top menu bar.
2. Scroll down to the Board: entry (i.e. Board: Arduino/Genuino Uno).
3. A submenu will open when you highlight the Board: entry.
4. At the top of the submenu is Boards Manager. Click on it to open the Boards Manager dialog box.
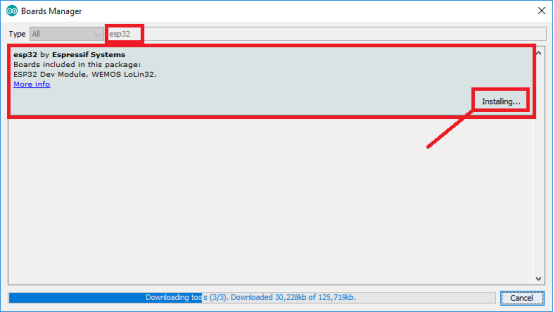
5. In the search box in the Boards Manager enter“esp32”.
6. You should see an entry for“esp32 by Espressif Systems”. Highlight this entry and click on the Install button.
7. This will install the ESP32 boards into your Arduino IDE
If you go back into the Boards: submenu you should now see a number of ESP32 boards. You’ll need to select the board that matches (or is equivalent to) the ESP32 board you have purchased.
For the record, I used an https://www.espressif.com/sites/default/files/documentation/esp32-wrover-e_esp32-wrover-ie_datasheet_en.pdf
https://docs.espressif.com/projects/arduino-esp32/en/latest/getting_started.html